
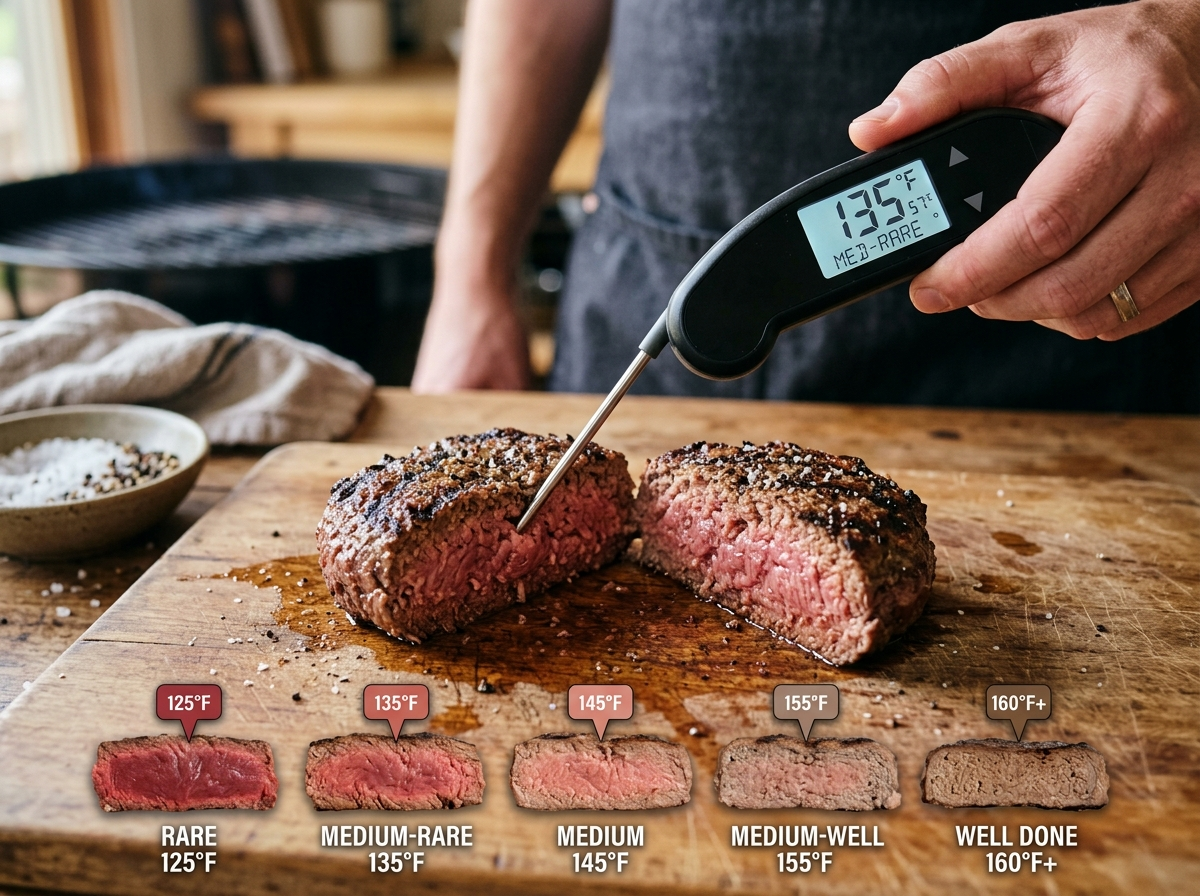
A single burger patty sits between two very different outcomes — a juicy, perfectly cooked masterpiece or a dried-out hockey puck nobody wants seconds of. The difference? About 10 to 15 degrees on a thermometer. That’s it. And yet, most backyard cooks and even some kitchen veterans are still cutting into their burgers to “check” doneness, letting all those beautiful juices run out onto the plate.
This guide breaks down the exact internal temperatures you need for every level of burger doneness — from rare all the way to well done. You’ll learn what the USDA actually recommends, why those numbers matter, how to read your thermometer correctly, and how to adjust your approach based on the type of meat you’re using. No guesswork, no dry patties, no anxiety about food safety.
Why Internal Temperature Matters More Than Timing
Here’s something most burger recipes won’t tell you: cooking time is a terrible way to judge doneness. A 1/3-pound patty on a 450°F grill doesn’t cook the same as a 1/2-pound patty on a 375°F flat top. The thickness, fat content, starting temperature of the meat, wind speed outside, grill surface material — all of these change how fast heat travels to the center of your burger.
Time is a rough estimate at best. Internal temperature is the only reliable measurement.
Think of it like driving somewhere. You wouldn’t say “I’ll be there in 30 minutes” without knowing how far away the destination is or what traffic looks like. Temperature is your GPS — it tells you exactly where you are in the cooking process, not just how long you’ve been at it.
Pro Tip: Take your ground beef out of the fridge about 15–20 minutes before cooking. Starting at room temperature helps the patty cook more evenly from edge to center, which means a more consistent reading when you check the temp.
If you’ve been eyeballing your burgers and hoping for the best, getting a reliable thermometer for your burgers is the single biggest upgrade you can make.
The Complete Burger Doneness Temperature Breakdown
Let’s get right to the numbers. These are internal temperatures measured at the thickest point of the patty, right in the center.
Rare — 120°F to 125°F
A rare burger has a cool, deep red center that takes up most of the patty. The outer edges will be brown and cooked, but the middle is soft, almost squishy to the touch. The flavor is intensely beefy, and the texture is very tender.
Now, here’s the honest truth: the USDA doesn’t recommend eating ground beef below 160°F. Unlike a rare steak — where bacteria only live on the surface — ground beef has been processed through a grinder, meaning bacteria can get mixed throughout the meat. So eating a rare burger does carry more risk than eating a rare steak.
That said, plenty of restaurants serve rare burgers, especially when they use freshly ground, high-quality beef from trusted sources. If you grind your own hamburger meat at home, you have much more control over freshness and handling, which reduces risk significantly.
Medium Rare — 130°F to 135°F
This is the sweet spot for a lot of burger lovers. You get a warm, pink-to-red center that’s juicy without feeling undercooked. The outside has a nice sear, and the fat in the beef has started to render, which brings out deeper flavor.
At 130°F to 135°F, the proteins in the meat have firmed up slightly but haven’t squeezed out their moisture yet. That’s why medium rare burgers tend to be the juiciest. The texture has some give when you press the patty — it pushes back gently but doesn’t feel mushy.
If you want to understand exactly what happens at this temperature and what kind of beef works best for it, take a look at our deep dive on medium rare burger temperature.
Medium — 140°F to 145°F
Medium is where you start to find the comfort zone for people who want some pink but aren’t fully on board with a red center. The inside of the patty is warm pink throughout the middle, with a thicker band of brown around the edges.
At this temperature, you still have plenty of juice in the burger. The fat is rendering well, the Maillard reaction has done its work on the outside, and the texture has a satisfying firmness without any dryness. For most people who say they like their burgers “not too pink but not dried out,” medium is exactly what they’re describing.
Quick Fact: 145°F is the USDA’s recommended safe temperature for whole cuts of beef (like steaks). Ground beef has a different recommendation — 160°F — because of how the meat is processed. We’ll talk more about that in the safety section below.
Medium Well — 150°F to 155°F
The pink is mostly gone at this stage. You might see a faint blush of color right at the center, but most of the patty is brown throughout. The texture is firmer, and the burger has started to lose some moisture compared to medium.
This is where fat content really starts to matter. A burger made with 80/20 ground beef (80% lean, 20% fat) holds up much better at medium well than a 90/10 blend would. That extra fat keeps things from turning into cardboard. If you’re not sure what ratio to use, check out our guide on the best fat ratio for burgers — it makes a bigger difference than most people realize.
If someone at your cookout asks for medium well, don’t judge them — just make sure your beef has enough fat to handle it.
Well Done — 160°F and Above
At 160°F, the burger is fully cooked through with no pink remaining. This is the USDA’s official safe temperature for ground beef, and it’s the doneness level you should aim for when cooking for young children, elderly family members, pregnant guests, or anyone with a compromised immune system.
The reputation well done burgers have for being dry isn’t entirely undeserved — but it’s avoidable. There are a few tricks that help. Mixing a small amount of butter, a splash of Worcestershire sauce, or even a bit of grated onion into the ground beef before forming patties adds moisture that survives higher temperatures. Using wagyu tallow in your burger cooking process is another technique that helps retain richness at higher doneness levels.
Also, don’t go past 165°F unless you absolutely have to. Every degree above 160°F pulls more moisture out of the meat with very little food safety benefit. The pathogens are already eliminated at 160°F.
USDA Guidelines vs. Restaurant Reality
This is where things get interesting — and where a lot of confusion lives.
The USDA recommends cooking all ground beef to an internal temperature of 160°F. Their logic is sound: grinding beef breaks down the surface of the meat and mixes any surface bacteria into the interior. Pathogens like E. coli O157:H7 and Salmonella can survive at lower temperatures, and since you can’t see bacteria, the only guarantee is hitting that 160°F mark.
But walk into almost any burger restaurant worth its salt, and you’ll see medium and medium rare options on the menu. How do they get away with it?
A few reasons. Restaurants that serve below-160°F burgers often source higher-quality beef, grind it fresh in-house, maintain strict cold-chain protocols, and serve it immediately. Some states require a consumer advisory on the menu — that little note at the bottom that says “consuming raw or undercooked meats may increase your risk of foodborne illness.”
So what should you do at home? That’s a personal call. If you’re buying pre-ground beef from a grocery store and it’s been sitting in a display case, cooking to 160°F is the safest play. If you’re grinding your own beef from whole cuts you purchased that day, the risk drops significantly at lower temps.
⚠️ Important: Immunocompromised individuals, children under 5, adults over 65, and pregnant women should always eat ground beef cooked to 160°F. This isn’t about preference — it’s about real health risk.
How to Check Burger Temperature the Right Way
Owning a thermometer is step one. Using it correctly is step two — and a lot of people get step two wrong.
The most common mistake is inserting the thermometer from the top of the patty straight down. On a patty that’s only 3/4 inch thick, the probe tip might go right through the meat and touch the hot grill grate underneath, giving you a reading that’s 50 or 60 degrees too high. You’d pull the burger thinking it’s done, cut into it, and find raw meat in the middle.
Instead, insert the thermometer probe from the side of the patty, horizontally, so the tip reaches the center. This keeps the sensor surrounded by meat on all sides and gives you the most accurate reading.
Here’s the right technique:
Hold the patty gently with tongs, tilt it slightly if you need to, and slide the thermometer probe into the thickest part from the side. Push it in until the tip is right in the middle of the patty. Wait a few seconds for the reading to stabilize — instant-read thermometers usually take 2 to 4 seconds.
If your burgers are thick — say, 3/4 inch or more — you have a bigger target and it’s easier to get an accurate read. Thinner patties are trickier, which is one reason patty thickness matters for more than just cooking time.
Did You Know? Carryover cooking raises the internal temperature of a burger by 3 to 5 degrees after you pull it off the heat. So if you want a medium burger at 145°F, pull it at 140°F and let it rest for about 2 minutes. The residual heat does the rest.
How Meat Type Changes the Temperature Rules
Not all burgers are beef burgers. And different proteins have different safety thresholds, textures, and cooking behaviors. You can’t treat a turkey burger the same way you’d treat an 80/20 beef patty — the results will punish you.
Beef Burgers
Everything we’ve discussed above applies directly to standard ground beef. The USDA target is 160°F, with flexibility below that depending on your sourcing and risk tolerance. The best meat for burgers generally falls in the chuck or chuck-brisket blend category, with enough fat to keep things juicy across different doneness levels.
Turkey and Chicken Burgers
Poultry burgers have no flexibility zone — they must reach 165°F to be safe. Salmonella in ground poultry is a legitimate concern, and unlike beef, there’s no “medium rare” option here.
The challenge is that 165°F tends to produce dry, chalky poultry burgers. To fight this, add moisture-retaining ingredients: grated zucchini, a beaten egg, breadcrumbs soaked in milk, or finely diced onion mixed into the ground meat before forming patties. These additions help the burger hold onto water even at higher temperatures.
If you’re curious about cooking poultry right in general, our piece on homemade chicken tenders covers a lot of the same temperature and moisture-retention principles.
Pork Burgers
Ground pork should hit 160°F, same as ground beef per the USDA. Pork burgers tend to be leaner than beef unless you specifically ask for fatty ground pork, so keep an eye on moisture. Adding a tablespoon of mayo or an egg yolk to the mix helps.
Lamb Burgers
Lamb follows the same USDA guideline as beef — 160°F for ground lamb. Lamb fat has a higher melting point than beef fat, so lamb burgers can sometimes feel greasier at medium temperatures because the fat hasn’t fully rendered yet. Cooking them to at least medium (145°F) helps the fat melt properly and improves both flavor and texture.
Plant-Based Burgers
Here’s one that surprises people. Plant-based burgers from brands like Beyond Meat and Impossible don’t carry the same bacterial risks as animal protein, but they still taste best at specific temperatures. Beyond Meat recommends cooking their patties to 165°F internally for the best texture — the proteins and fats in the patty need that heat to set properly and mimic the mouthfeel of a real burger.
Undercooking a plant-based patty won’t make you sick the way undercooked chicken would, but it’ll taste mushy and gummy. Nobody wants that. We’ve actually covered this topic in detail over at our guide on meatless burgers and why temperature matters.
Cooking Method Matters: Adjusting for Grill, Flat Top, and Oven
The target internal temperature stays the same regardless of how you cook your burger. A medium rare burger is 130°F to 135°F whether it comes off a charcoal grill, a cast iron skillet, or a flat top griddle. But the way heat transfers to the patty does change your approach.
On the Grill
Grilling uses a combination of direct radiant heat from below and convective heat from the surrounding air (especially with the lid closed). This means the bottom of the patty cooks faster than the top, creating a more uneven heat distribution. That’s why flipping matters — and knowing when to flip your burgers affects how evenly the patty reaches your target temp.
For most burgers on a grill set to medium-high (around 400°F to 450°F), you’re looking at roughly 4 minutes per side for medium. But again — use the thermometer, not the clock.
There’s also the ongoing debate about heat source. If you’re curious whether your choice of fuel affects the final product, we compared charcoal vs. gas for burgers and the results might change how you cook this weekend.
On a Flat Top or Cast Iron
Flat tops and cast iron pans deliver contact heat — the entire bottom surface of the patty touches hot metal. This creates more even browning and crust formation. It’s also why smash burgers work so well on flat surfaces. The thin, pressed patty maximizes surface contact, creating an insane crust while still cooking through quickly.
If you haven’t tried making smash burgers at home, it’s worth the experiment. Because smash burgers are so thin (usually under 1/4 inch), they cook through to well done almost instantly. You don’t even need a thermometer for true smash burgers — the thinness does the work for you.
For thicker patties on cast iron, you’ll still want to check temps with a probe. Reduce your heat slightly compared to the grill — around 375°F to 400°F surface temperature — because the constant contact cooks the exterior faster and can burn the outside before the center catches up.
In the Oven
Oven-baked burgers use convective heat surrounding the patty from all sides. It’s the most even cooking method, but it doesn’t produce a good crust on its own. The move here is to sear the patties in a hot pan for about 90 seconds per side, then transfer them to a 375°F oven to finish to your desired internal temp.
This sear-and-finish method gives you the best of both worlds: great Maillard crust from the pan, gentle even cooking from the oven. It’s particularly useful when you’re cooking a large batch — say, for a football watch party — because you can sear six patties in a big skillet and then park them all in the oven to finish at the same time.
Resting Your Burger: The Step Most People Skip
You pulled the burger at the right temp. Great. Now put it on a plate and walk away for two minutes.
Resting lets the temperature equalize throughout the patty and allows the muscle fibers, which tightened during cooking, to relax slightly. This relaxation lets the juices redistribute inside the meat instead of flooding out onto the plate when you take that first bite.
Two minutes is plenty for a standard burger patty. You don’t need to tent it with foil or do anything special — just set it on a clean plate or cutting board and let it sit.
During those two minutes, the internal temperature will rise by 3 to 5 degrees (that carryover cooking we mentioned earlier). So factor that into your pull temp. Aiming for 145°F (medium)? Pull at 140°F to 141°F. Aiming for 160°F (well done)? Pull at 155°F to 156°F.
This small patience pays off in a noticeably juicier burger. And if you’ve ever wondered why your burgers dry out, skipping the rest is one of the biggest culprits.
Quick Reference: Burger Temperature at a Glance
Here’s your cheat sheet for quick reference while you’re standing at the grill:
- Rare: 120°F – 125°F (cool red center)
- Medium Rare: 130°F – 135°F (warm red-pink center)
- Medium: 140°F – 145°F (warm pink center)
- Medium Well: 150°F – 155°F (slight hint of pink)
- Well Done: 160°F+ (no pink, fully cooked)
- Poultry Burgers: 165°F (non-negotiable)
Print this out, tape it to the inside of your grill lid, screenshot it on your phone — whatever works. Having the numbers in front of you means you won’t second-guess yourself mid-cook.
For an even more visual breakdown with cooking tips at each level, our burger doneness chart explained walks through what each stage looks, feels, and tastes like.
FAQ
What is the safest internal temperature for a burger?
The USDA recommends 160°F for all ground beef burgers. At this temperature, harmful bacteria like E. coli and Salmonella are eliminated. For ground poultry (turkey or chicken burgers), the safe minimum is 165°F. If you’re cooking for kids, elderly individuals, or anyone with health concerns, stick to these numbers without exception.
Can you eat a burger at medium rare safely?
Many people eat medium rare burgers (130°F to 135°F) regularly, especially at restaurants that grind their beef fresh. The risk is lower with high-quality, freshly ground meat from a trusted source. If you grind your own beef at home from whole cuts, you reduce bacterial contamination further. That said, any ground beef consumed below 160°F carries some degree of risk — it’s a personal judgment call based on sourcing and your own health.
How do I know if my thermometer is accurate?
Do the ice water test. Fill a glass with ice, add cold water, stir for about 30 seconds, then insert your thermometer probe. It should read 32°F (0°C). If it’s off by more than a couple degrees, calibrate it if possible or replace it. An inaccurate thermometer defeats the entire purpose of checking your burger temp.
Should I check the temperature of every burger on the grill?
If you’re cooking patties that are all the same size, weight, and thickness, and they all went on the grill at the same time, checking two or three representative patties is usually enough. But if your patties are different sizes or someone wants different doneness levels, check each one individually. It takes 3 seconds per patty — don’t skip it.
Does the type of grill affect the internal temperature I should target?
No. The target internal temperature for your desired doneness stays the same regardless of whether you’re using charcoal, gas, a flat top, or an oven. What changes is the cooking time and heat management needed to reach that temperature. A charcoal grill with hot spots might cook unevenly, so you’ll want to check temps more carefully. A flat top delivers consistent heat, making it easier to predict timing.
Your Next Burger Is Going to Be Better
Getting burger temperature right isn’t complicated — it just requires a $15 instant-read thermometer and the willingness to use it. Once you start cooking by temperature instead of time, you’ll wonder how you ever went without it. Your burgers will be juicier, more consistent, and safer. Every single time.
Start with whichever doneness level sounds good to you, pull the patty a few degrees early to account for carryover, let it rest for two minutes, and enjoy. If you want to take things a step further, pair the right temperature with the right seasonings for your burgers and you’ll be turning out restaurant-quality patties from your own backyard.
Now go fire up that grill.