
Most burgers don’t dry out because of bad meat or the wrong grill. They dry out because someone flipped them too early, too often, or at the worst possible moment. That single move — picking up your spatula and turning the patty — is the difference between a burger that’s juicy and charred in all the right places, and one that crumbles apart or turns into a hockey puck.
The frustrating part? Nobody really teaches you when to flip. Recipes say things like “cook 4 minutes per side,” but your grill isn’t the same as theirs. Your patties aren’t the same thickness. The weather outside isn’t even the same. So a fixed time doesn’t always work.
That’s exactly what this guide is about. You’ll learn to read the actual signs your burger gives you — visual cues, textures, sounds — so you flip at exactly the right moment no matter what you’re cooking on. Whether you’re working a charcoal grill, a gas setup, a flat top, or a cast iron skillet indoors, the principles stay the same once you understand what’s really happening inside that patty.
Why the Flip Matters More Than You Think
Here’s something most people don’t realize: flipping isn’t just about cooking both sides evenly. The moment you flip affects moisture retention, crust development, and even how well your burger holds together on the bun.
When raw ground beef hits a hot cooking surface, the proteins on the bottom start to firm up and create a sear. That sear does two things. It builds flavor through the Maillard reaction (that beautiful browning), and it forms a “shell” that helps hold the juices inside. If you flip before that shell sets up, the patty tears. Juices leak. You lose flavor and structure at the same time.
Flip too late, and the bottom burns while the top stays raw. You end up overcompensating by pressing the burger down — which squeezes out even more moisture. It’s a cycle that ends with a dry, sad patty every time.
The sweet spot is a narrow window, usually just 60 to 90 seconds wide. But finding that window depends on several things you can actually observe in real time.
The Visual Cues That Tell You It’s Time
Forget the timer on your phone for a second. Your eyes are the best tool you’ve got at the grill. Here’s what to actually look for.
Moisture Beading on Top
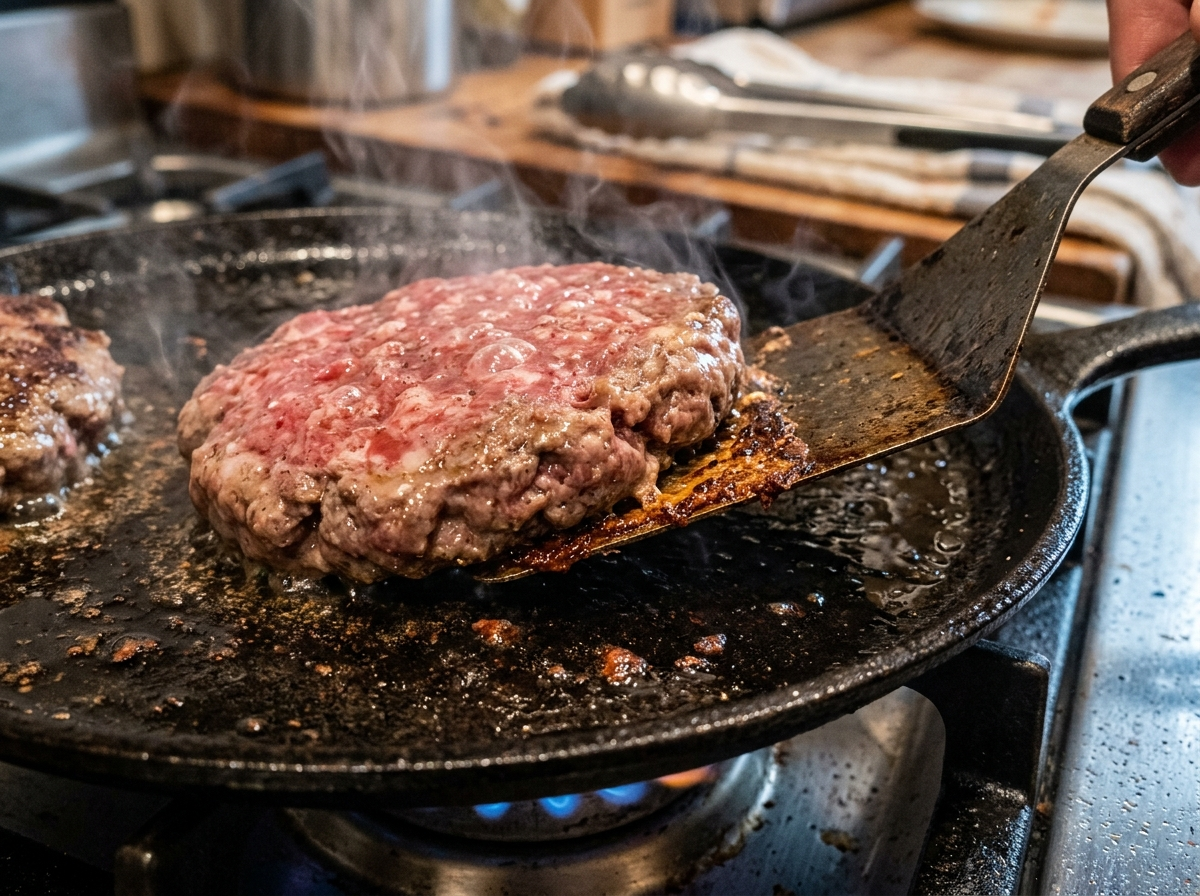
This is the single most reliable sign, and it works for every cooking method. As the bottom of the patty heats up, moisture gets pushed upward. You’ll start to see tiny droplets — almost like sweat — forming on the raw surface of the burger.
When those droplets are scattered across about two-thirds of the top surface, your burger is ready to flip. The bottom has set, the sear is forming, and the interior has started cooking from below without being overdone.
If you wait until the entire top surface is covered in moisture, you’ve probably gone a bit too long. The burger will still be fine, but you’re edging toward a thicker crust on the bottom than you might want.
Edge Color Change
Watch the sides of the patty. As the burger cooks from below, you’ll see the color shift from raw pink/red to grayish-brown, starting at the bottom edge and creeping upward. When that color change reaches roughly one-third to halfway up the side of the patty, it’s flip time.
This method works especially well for thicker burgers — half-inch and above — where the moisture beading can be harder to spot because the surface area is smaller relative to the mass.
The Patty Releases Easily
Try sliding your spatula under the burger gently. If it resists and sticks, it’s not ready. A properly seared patty will release from the grate or cooking surface almost on its own. That natural release tells you the crust has formed and the proteins have firmed up enough to hold together during the flip.
Pro Tip: If you’re grilling and the patty sticks badly, your grates probably weren’t hot enough or clean enough before you started. Oil the grates next time, or brush them down right before the patties go on.
Timing Guidelines by Cooking Method
Visual cues should always be your primary guide. But having a rough time range in your head helps you know when to start paying close attention. These times assume your patties are about three-quarters of an inch thick and weigh roughly a third of a pound each.
On a Charcoal Grill
Charcoal runs hot and uneven, which is both a blessing and a challenge. Direct heat from good coals can easily hit 500°F to 600°F at grate level.
Expect your first flip around the 3 to 4 minute mark. Charcoal sears fast, so the moisture beading shows up quicker than on gas. Keep the lid off for the initial sear — you want direct radiant heat, not convection cooking. Putting the lid on too early steams the burger instead of searing it, and steamed burgers don’t develop that crust you’re after.
If you’re choosing between charcoal vs gas for your burgers, keep in mind that charcoal’s higher heat means a shorter window before you need to flip. Pay more attention, but you’ll be rewarded with better char flavor.
On a Gas Grill
Gas grills are more predictable. Preheat on high for 10 to 15 minutes, then cook the burgers over direct high heat.
Your flip window here is usually 4 to 5 minutes. Gas doesn’t quite hit the same peak temperatures as a charcoal bed, so the sear develops a bit slower. That’s fine — it actually gives you a slightly wider margin for error.
For the best results when grilling at optimal temperatures, get your grate surface to at least 450°F before the patties go on. Anything below 400°F and you’re more likely to get a gray, steamed patty than a properly seared one.
On a Flat Top or Griddle
Flat tops are the secret weapon of burger joints everywhere, and for good reason. The entire surface is a consistent, even heat source. No hot spots, no cool zones (if it’s preheated properly).
Flat top burgers usually need 3 to 4 minutes before the flip. The full-contact surface means more of the patty is touching heat compared to a grill grate, so searing happens efficiently.
This is also where smash burgers really shine. Smash technique changes the flip timing dramatically — more on that in a moment.
If you’ve been wondering about the flat top vs grill debate, the flip timing difference is one of the key practical distinctions. Flat tops give you more control, but you lose the smoky char that grates provide.
In a Cast Iron Skillet
Cast iron at home follows the same logic as a flat top but on a smaller scale. Preheat the skillet on medium-high for a solid 5 minutes before adding the burger. You want that pan hot.
Flip after about 3 to 4 minutes. Cast iron holds heat incredibly well, so once it’s up to temperature, it stays there even when the cold patty hits the surface. The sear you get from a properly heated cast iron skillet rivals anything a restaurant flat top can do.
Smash Burgers: A Completely Different Flip Game
If you’re making smash burgers, throw most of the timing advice above out the window. Smash burgers play by different rules.
You take a ball of ground beef, place it on a ripping-hot flat surface, and press it flat — really flat, maybe a quarter inch thick — within the first 30 seconds. Then you leave it alone.
The flip on a smash burger comes fast, usually at the 2 to 2.5 minute mark. Because the patty is so thin, it sears almost immediately. You’ll see the edges get dark and crispy, and the top will start to change color quickly. The moment those edges look lacy and browned, get your spatula under it and flip. Scrape hard — you want every bit of that crust to come with the patty, not stay stuck on the griddle.
After the flip, a smash burger only needs another 1 to 1.5 minutes. Add your cheese right after the flip so it melts during that final stretch. Total cook time for a smash burger is roughly 3 to 4 minutes, start to finish. That’s it. The speed is what keeps them juicy despite being so thin — you’re not giving the moisture time to escape.
Check out the smash burgers vs regular burgers breakdown if you’re curious about why the technique produces such different results from a traditional thick patty.
How Many Times Should You Flip?
There’s a long-running debate in the grilling world about this. The traditional advice? Flip once. Only once. Touch the burger as little as possible.
And honestly, for most home cooks, that’s still solid advice. One flip keeps things simple. You build a crust on side one, flip, build a crust on side two, and you’re done. Less handling means less chance of the patty breaking apart or losing juice.
But here’s where it gets interesting. Some food scientists — including folks like J. Kenji López-Alt — have tested the multi-flip method and found that flipping every 30 to 60 seconds can actually cook the burger faster and more evenly, with slightly better moisture retention. The theory is that frequent flipping keeps both sides from overcooking while maintaining a more even internal temperature.
So which should you do?
If you’re a beginner or you’re cooking for a crowd and can’t babysit each patty, stick with one flip. It’s forgiving and it works.
If you’re cooking one or two burgers and you don’t mind staying attentive, try the frequent-flip method. You might notice a juicier result, especially on thicker patties.
What you should never do is flip the burger once and then keep pressing it down with your spatula. That doesn’t speed up cooking in any meaningful way. It just squeezes out the fat and juice you’ve been trying to protect. If you’re worried about why your burgers dry out, pressing is almost always the culprit.
Thickness Changes Everything
A quarter-pound patty that’s half an inch thick and a half-pound patty that’s an inch thick aren’t just different in size — they behave completely differently on the grill.
Thin patties (under half an inch) cook fast. They’re more forgiving about flip timing because the heat penetrates quickly. You’ve got maybe a 3-minute window per side, tops. The bigger risk with thin patties isn’t flipping too late — it’s overcooking them entirely.
Thick patties (three-quarters of an inch and above) need patience. The sear takes longer to develop because the mass of cold meat absorbs more heat from the cooking surface. You might need a full 5 minutes before that first flip. And after the flip, thick patties often benefit from moving to indirect heat (or lowering the burner) so the inside can catch up without the outside burning.
This is where an instant-read thermometer becomes your best friend. Visual cues tell you when to flip, but a thermometer tells you when the burger is done. Knowing the right internal temperatures for every doneness level means you don’t have to guess.
If you’re unsure about how thick your burgers should be, think about what kind of cooking experience you want. Thinner patties are faster and more foolproof. Thicker patties give you more control over doneness but demand more attention at the grill.
The Role of Fat Content in Flip Timing
This one catches people off guard. The fat percentage of your ground beef actually affects when you should flip.
Leaner blends — like 90/10 or 93/7 — have less intramuscular fat to keep them moist. They sear a bit differently because there’s less fat rendering out and lubricating the cooking surface. Lean burgers tend to stick more and dry out faster. Flip them on the earlier side, and don’t push your luck trying to get a deeper sear.
Fattier blends — 80/20 is the classic burger ratio, and for good reason — render fat as they cook, which naturally bastes the patty and creates a self-lubricating layer on the cooking surface. You can let an 80/20 burger sit a little longer before flipping because the rendering fat is actually helping, not hurting.
If you’re wondering about the best fat ratio for burgers or trying to figure out the best meat for your burgers, fat content should be part of that decision. It’s not just about flavor — it directly impacts how the burger behaves on the heat.
What About Meatless Burgers?
Plant-based patties from brands like Impossible and Beyond Meat have gotten really popular, and their flip timing is a bit different from beef.
Most meatless burgers are designed to mimic beef’s cooking behavior, but they don’t render fat the same way. They can go from perfectly cooked to dry and rubbery in a hurry. The flip window is narrower.
Generally, flip plant-based burgers at the 3-minute mark on medium-high heat and cook for another 2 to 3 minutes on the other side. Watch for the same visual cues — edge color change and easy release — but act faster than you would with a beef patty.
Internal temperature matters with meatless burgers too. Most brands recommend an internal temp of 165°F, which is higher than what many people cook beef burgers to. An instant-read thermometer is especially useful here because you can’t rely on the “pink in the middle” test that works with beef.
Mistakes That Ruin the Flip
Let’s talk about what goes wrong, because knowing what not to do is just as valuable as knowing the right technique.
Cold patties on a cold surface. If you put refrigerator-cold burgers on a grill that hasn’t preheated, nothing will sear properly. The surface temperature drops the moment the meat hits it, and you end up with a patty that stews in its own juice instead of searing. Take your patties out of the fridge 15 to 20 minutes before cooking. And preheat your grill or pan for at least 10 minutes.
Flipping with a fork. Forks puncture the surface. Juice runs out through the holes. Use a wide, thin spatula. For grill grates, a spatula with a slight bend (an offset spatula or a fish spatula) works great because it slides under the patty without scraping.
Moving the burger around before flipping. Once the patty goes on the heat, don’t slide it around. Let it sit. Every time you move it, you disrupt the sear that’s forming. Place it, leave it, flip it once the cues tell you it’s ready.
Flipping onto a cool zone. If you’re grilling, make sure the spot you flip onto is just as hot as the spot the burger was already on. On a gas grill, that means flipping in place. On charcoal, it means being aware of where your coals are banked.
Quick Method: The Touch and Tilt Test
Here’s a simple trick that experienced line cooks use, and you can do it at home.
After your burger has been cooking for a few minutes, tilt your spatula against the side of the patty and gently nudge it. If the patty slides freely and you can see a brown crust has formed on the underside, it’s flip-ready. If it resists or feels mushy and stuck, give it another minute.
After flipping, you can also use the “touch test” to gauge doneness. Press the center of the patty lightly with your finger:
- Soft and squishy = rare to medium-rare
- Slightly firm with some give = medium
- Firm with very little bounce = well done
This method takes practice, and it’s not as accurate as a thermometer. But once you’ve done it a few dozen times, your fingers become surprisingly reliable. Pair it with a good burger doneness chart until you’ve built confidence.
FAQ
How do I know when to flip a burger without a timer?
Watch for moisture beading on the top surface of the patty and a color change creeping up from the edges. When the bottom third to half of the patty’s sides have turned from pink to grayish-brown, and you see small droplets forming on top, it’s time. Also test whether the patty releases from the cooking surface easily — a properly seared burger won’t stick.
Should I only flip a burger once?
For most home cooking situations, one flip produces great results. It keeps things simple and gives you a strong sear on both sides. There is evidence that multiple quick flips (every 30 to 60 seconds) can cook the burger more evenly and retain slightly more moisture, but this requires constant attention. Either method works — just don’t flip randomly or press the patty down after flipping.
Does the type of grill change when I should flip?
Yes. Charcoal grills run hotter, so expect to flip around 3 to 4 minutes. Gas grills are slightly cooler, putting your flip closer to 4 to 5 minutes. Flat tops and cast iron skillets offer full-contact heat and usually need 3 to 4 minutes before flipping. Always prioritize visual and tactile cues over exact times, since every setup runs a little differently.
Can I flip a smash burger the same way as a regular burger?
No. Smash burgers are much thinner and cook significantly faster. You’ll flip a smash burger after about 2 to 2.5 minutes — as soon as the edges look crispy and lacy. After flipping, add cheese immediately and cook for just another 1 to 1.5 minutes. The whole process takes under 4 minutes.
What happens if I flip my burger too early?
The sear hasn’t formed, so the patty may tear or stick to the cooking surface. Juices escape through the broken surface, and you lose both flavor and moisture. If you realize you’ve flipped too early, don’t try to flip it back — just let it finish cooking on the new side and adjust your timing on the next burger.
Your Flip, Your Burger
Getting the flip right isn’t about following someone else’s recipe to the second. It’s about learning to read your burger — the moisture on top, the color on the edges, the way it responds when you nudge it. Those signals don’t lie, and they work whether you’re grilling in July or cooking on cast iron in your kitchen in January.
Start paying attention to those cues the next time you cook, and within a few sessions, you won’t even think about it. You’ll just know. And that’s when your burgers start tasting like they came from your favorite burger joint instead of your backyard.
One last thing: get yourself a reliable instant-read thermometer. Visual cues nail the flip timing, but a thermometer nails the finish. Together, they’re all you need to cook burgers that genuinely impress people.