
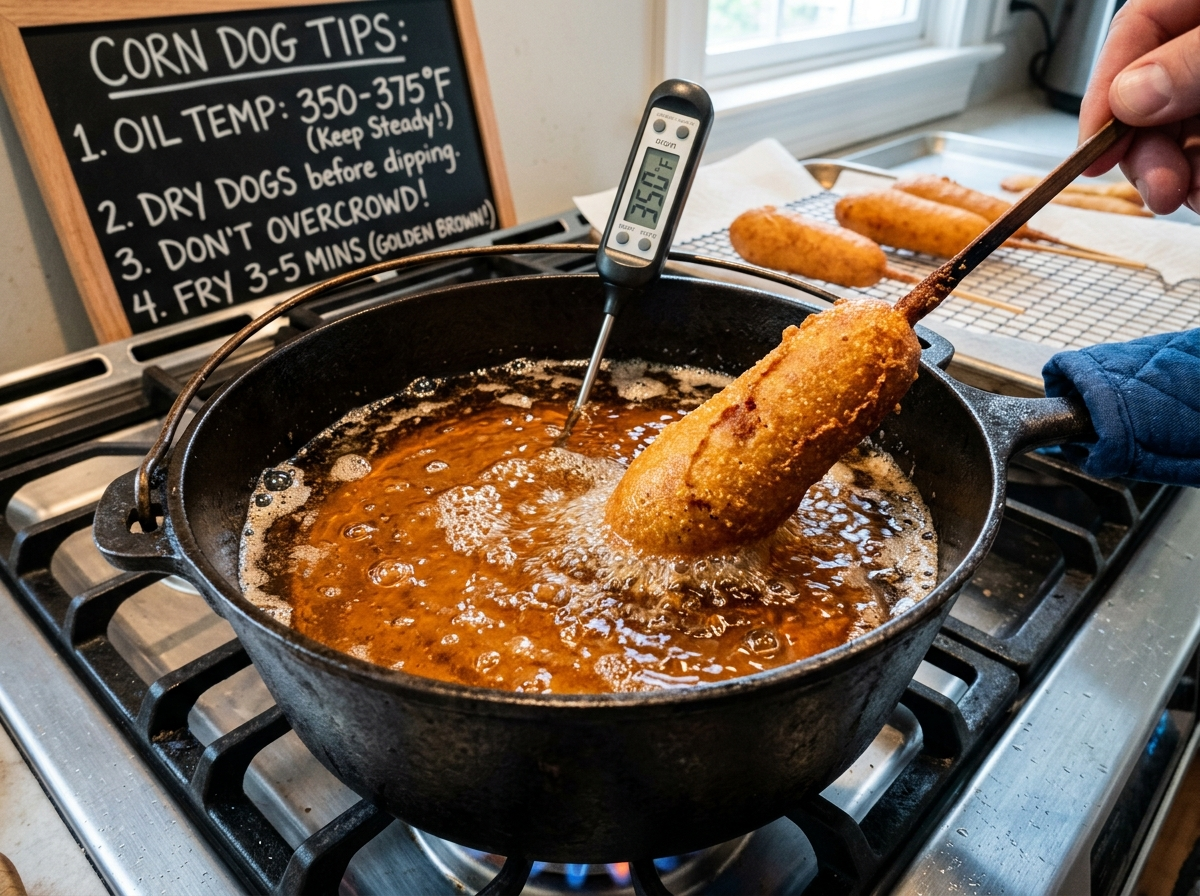
A perfectly fried corn dog — golden, crispy, slightly sweet on the outside, hot dog cooked through on the inside — takes about three minutes to eat. But getting it right at home? That’s where most people stumble. The batter slides off. The outside burns while the inside stays cold. Or worse, the whole thing falls apart in the oil.
Here’s the thing: corn dogs aren’t hard to make. They’re actually one of the simplest fried foods you can tackle in your own kitchen. The catch is that they’re surprisingly unforgiving when your oil temperature is off, your batter consistency is wrong, or your technique needs a little work. A few degrees too hot or too cold, and you’ll know it instantly.
This guide covers everything you need to nail homemade corn dogs — the right frying temperature, the batter tricks that actually matter, and the small details that make the difference between a sad, soggy stick and something that rivals what you’d get at a state fair.
Why Oil Temperature Is Everything for Corn Dogs
You’ve probably heard that frying temperature matters. With corn dogs, it matters more than most fried foods. And here’s why.
A corn dog is a thick layer of batter surrounding a pre-cooked hot dog. You’re not trying to cook raw meat to a safe internal temperature — the hot dog is already cooked. What you need is for the batter to cook all the way through to a crisp, golden finish while the hot dog inside gets heated to the point where it’s steaming and juicy.
That’s a balancing act. Too-hot oil will brown the batter fast on the surface, leaving it raw and doughy underneath. Too-cool oil lets the corn dog sit in the fryer too long, which means the batter absorbs grease like a sponge. You end up with something heavy, soggy, and unpleasant.
The sweet spot for frying corn dogs is 350°F to 375°F (175°C to 190°C). Most experienced cooks and food truck operators settle right around 365°F as the ideal target. At this temperature, the batter sets quickly enough to prevent oil absorption, cooks evenly all the way through, and develops that signature deep golden color in about 3 to 4 minutes.
If you’ve ever struggled with getting fried foods crispy and non-greasy, the same principles apply here. Temperature control is the single biggest factor.
The Batter: Getting the Consistency Right
Let’s talk batter, because even perfect oil temperature can’t save a bad one.
Traditional corn dog batter is cornmeal-based, and that’s non-negotiable if you want the real deal. You’ll find recipes online that use pancake mix or straight flour batter — those work, but they don’t give you a true corn dog. They give you a battered hot dog. There’s a difference.
A solid homemade corn dog batter uses a mix of yellow cornmeal and all-purpose flour, usually in a ratio close to 2:1 (cornmeal to flour). The cornmeal gives you that slightly gritty, sweet crunch. The flour adds structure and helps the batter cling.
Here’s a base recipe that works consistently:
Cornmeal Batter Base: 1 cup yellow cornmeal, ½ cup all-purpose flour, 1 tablespoon sugar, 1 ½ teaspoons baking powder, ¼ teaspoon salt, 1 egg, ¾ cup buttermilk (or regular milk), and 1 tablespoon honey or melted butter if you want a slightly richer flavor.
The consistency you’re going for is thick — thicker than pancake batter, closer to something like a thick cake batter that coats the back of a spoon and holds there. If your batter drips off the hot dog quickly, it’s too thin. Add a tablespoon of cornmeal at a time until it clings.
One thing most recipes don’t tell you: let the batter rest for 10 to 15 minutes before you start dipping. The cornmeal needs time to hydrate and absorb the liquid. Fresh-mixed batter is looser and less cooperative. After a short rest, it thickens up and sticks much better.
Prepping the Hot Dogs (This Step Gets Skipped Too Often)
Most people grab a hot dog, shove a stick in it, dip it in batter, and drop it in the oil. And then they wonder why the batter slid right off.
There’s a simple reason: hot dogs are wet and slightly greasy on the surface. Batter doesn’t stick well to moisture. You need to dry them.
Take your hot dogs out of the package and pat them thoroughly with paper towels. Don’t just give them a quick dab — really dry the surface. Some cooks go a step further and lightly dust the dried hot dogs with a thin coating of flour or cornstarch before dipping. That dry layer acts like a primer, giving the batter something to grab onto.
Pro Tip: If you’re using standard-size hot dogs (about 6 inches), wooden skewers or chopsticks work fine. If you want the authentic corn dog experience, look for corn dog sticks or use thick wooden dowels cut to about 8 inches. Insert the stick about two-thirds of the way through the hot dog — not all the way, or it’ll poke through the batter at the top.
Another detail worth knowing: cold hot dogs work better than room-temperature ones. A cold dog straight from the fridge holds the batter better and gives you a little more frying time before the inside gets too hot. That extra time helps the batter cook through evenly.
The Dipping Technique That Makes or Breaks It
Here’s where things get practical. You’ve got your batter, your dried and skewered hot dogs, and your oil at 365°F. The dipping technique is where a lot of home cooks struggle, and it’s honestly the trickiest part.
If you’re dipping in a bowl, you’ll have a hard time. The hot dog is long and narrow, and a regular mixing bowl doesn’t give you the depth you need for an even coat. The best move? Pour your batter into a tall, narrow container. A tall drinking glass works. So does an empty, cleaned-out pint glass or a tall mason jar. You want to be able to dip the hot dog straight down vertically and pull it out with an even coating.
Dip the hot dog in, give it a slow twist, and pull it straight up. Let the excess drip off for a few seconds — you want a coating, not a thick glob. If the batter is the right consistency, it’ll cling in a smooth, even layer about ¼ inch thick.
Some people swear by pouring the batter into a tall, narrow glass and then spinning the hot dog as they pull it out. Others tilt the glass at an angle and roll the hot dog through. Both methods work. The key is getting even coverage without air pockets or bare spots.
And here’s a real-world tip you won’t see in most recipes: if you’re making a big batch, your batter will thicken as it sits. Keep a small amount of buttermilk or milk nearby. Add a splash and stir when the batter gets too stiff to coat properly. You want consistent thickness from the first corn dog to the last.
Frying: Step-by-Step So Nothing Goes Wrong
You’ve got a batter-coated corn dog on a stick. Your oil is at 365°F. Now what?
Lower it gently. Don’t drop it. Hold the stick and slowly lower the corn dog into the oil at an angle. The batter will start to set almost immediately — you’ll see it firm up and start to bubble within the first 5 to 10 seconds. Once the bottom half is set, you can release the stick and let the corn dog float.
Most corn dogs will float once the batter sets. This is normal and actually helpful. You’ll need to use tongs or a long fork to gently turn the corn dog a couple of times during frying so it browns evenly all around. Don’t spin it constantly — just a turn or two is enough.
Frying time at 365°F is about 3 to 4 minutes for standard-size corn dogs. Mini corn dogs (made with cocktail-size franks) take closer to 2 to 2½ minutes. You’re looking for a deep, even golden-brown color. If the corn dog is browning too fast (dark brown in under 2 minutes), your oil is too hot. If it’s still pale after 4 minutes, bump the heat up.
Warning: Don’t overcrowd the pot. Frying too many corn dogs at once drops the oil temperature dramatically. Two to three at a time is the right number for a standard home pot with about 3 to 4 inches of oil. Wait for the temperature to recover between batches — it usually takes 60 to 90 seconds.
This is the same principle that applies to frying chicken wings or mozzarella sticks at home. Crowding kills your oil temp, and low oil temp kills your crunch.
Choosing the Right Oil
Not all oils are created equal for deep frying, and your choice affects both flavor and performance.
For corn dogs, you want a neutral-flavored oil with a high smoke point. Peanut oil is the gold standard — it’s what most state fair vendors and food truck operators use. It handles high heat beautifully, doesn’t impart strong flavors, and produces a clean, crispy result.
Vegetable oil and canola oil are both solid, affordable alternatives. They have smoke points well above 400°F, so you’ve got plenty of headroom at 365°F. Sunflower oil works great too.
Avoid olive oil (smoke point too low and the flavor is too strong), coconut oil (flavor doesn’t match), and butter or lard for this particular application. If you’ve done any research into choosing the right oil for frying, the same guidelines apply here.
You’ll need enough oil to submerge the corn dogs — that usually means 3 to 4 inches of oil in your pot or Dutch oven. A deep, heavy-bottomed pot is ideal because it holds heat better than a thin pan.
Equipment You’ll Want on Hand
You don’t need a commercial deep fryer to make great corn dogs at home. But a few pieces of equipment make the process much smoother.
A deep-fry or candy thermometer is essential unless you’re using an electric countertop fryer with a built-in thermostat. Clip-on thermometers that attach to the side of your pot work perfectly. You need to monitor the oil temperature throughout the process — not just at the start.
A heavy-bottomed Dutch oven or deep pot holds heat far better than a thin saucepan. Cast iron is excellent for this. The thermal mass of heavy cookware means your oil temperature recovers faster after you add food.
Long tongs or a spider strainer for turning and removing corn dogs. A slotted spoon works in a pinch, but tongs give you more control.
A wire cooling rack set over a sheet pan is better than paper towels for draining. Paper towels trap steam against the bottom of the corn dog, which softens the crust. A rack lets air circulate all around, keeping things crispy.
If you don’t own a deep fryer or heavy pot, you can also fry at home using shallower methods — though for corn dogs specifically, you do need enough oil depth to submerge them, so this is one case where deep frying is the way to go.
Mini Corn Dogs: The Party-Friendly Version
If you’re making corn dogs for a game day spread or a kids’ party, mini corn dogs are the move. They’re easier to handle, cook faster, and people can grab them without needing plates.
Use cocktail-size franks (sometimes called “lil smokies”) and toothpicks or short skewers instead of full sticks. The batter recipe stays exactly the same. The only difference is frying time — minis need about 2 to 2½ minutes at 365°F.
Mini corn dogs also work great as part of a bigger spread alongside game day chili cheese fries or a football party finger food lineup. They’re one of those foods that disappear fast, so make more than you think you need.
Quick fact: The average American eats about 20 billion hot dogs per year, according to the National Hot Dog & Sausage Council. Corn dogs claim a good chunk of that number, with state and county fairs alone moving millions of them every summer season.
Troubleshooting Common Problems
Even with the right temperature and batter, things can go sideways. Here are the issues home cooks run into most often, and how to fix them.
The batter slides off before frying. Your hot dogs aren’t dry enough, or your batter is too thin. Pat the dogs dry again, dust them with a light coating of flour, and thicken the batter with a tablespoon of cornmeal.
The outside is dark but the inside batter is raw. Your oil is too hot. Drop the temperature to 350°F and give the corn dogs an extra 30 to 60 seconds. The lower heat lets the inside cook before the outside burns.
The corn dogs are greasy and heavy. Oil temperature is too low. Bring it back up to 365°F before your next batch. Also, make sure you’re draining on a wire rack, not a plate.
The batter cracks or splits during frying. This can happen if you dip the corn dog and then wait too long before putting it in the oil. Dip and fry immediately — don’t let the batter sit on the hot dog.
The corn dog sticks to the bottom of the pot. Lower the corn dog into the oil and hold it for 5 to 10 seconds before releasing. Once the outer layer of batter sets, it won’t stick. This is the same trick that works with crispy chicken fried steak — give the coating a moment to firm up before you let go.
What About Air Fryer or Oven-Baked Corn Dogs?
You’ll see a lot of recipes online for air fryer corn dogs or oven-baked versions. Do they work? Sort of.
Air fryer corn dogs can turn out decent, but they won’t give you the same texture as oil-fried ones. The batter doesn’t set the same way in circulated hot air — it tends to be drier and less evenly golden. If you go this route, spray the battered corn dogs generously with cooking spray and cook at 375°F for about 10 to 12 minutes, turning halfway.
Oven baking is trickier. The batter tends to flatten on the side resting on the pan, giving you an uneven shape. You can use a muffin tin to hold the sticks upright, which helps, but the texture still won’t match deep frying.
For the authentic corn dog experience — that audible crunch when you bite through, followed by sweet cornbread and a snappy hot dog — deep frying is still the best method. The other options are fine for convenience, but they’re a different product.
Picking the Right Hot Dogs
The hot dog you choose actually matters more than you’d think. Not all franks are built the same, and the differences show up in the final product.
All-beef hot dogs have the best flavor and snap for corn dogs. Brands like Nathan’s, Hebrew National, or a good butcher-shop frank give you a natural casing snap that pairs perfectly with the crispy batter. If you’re serious about your homemade hot dogs, you can even make your own franks before battering them.
Standard mixed-meat hot dogs (the kind you get in budget packs) work fine but tend to be softer and blander. They’ll do the job, but you won’t get that satisfying bite.
Avoid jumbo or extra-thick hot dogs unless you’re prepared to adjust your frying time. A thick dog takes longer to heat through, which means the batter is in the oil longer, which can lead to over-browning. Standard-diameter franks are your safest bet.
Storing and Reheating Leftovers
If you somehow have leftover corn dogs (it’s rare, but it happens), here’s how to handle them.
Let them cool completely, then store in an airtight container in the fridge for up to 3 days. You can also freeze them — lay them on a sheet pan in a single layer, freeze until solid, then transfer to a freezer bag. They’ll keep for about 2 months.
To reheat, skip the microwave. It’ll make the batter rubbery and sad. Instead, use your oven at 375°F for about 10 to 15 minutes (longer if frozen), or pop them back in the air fryer at 350°F for 5 to 8 minutes. You want to recrisp the outside without drying things out.
FAQ
What temperature should I fry corn dogs at?
The ideal frying temperature for homemade corn dogs is 365°F. Anywhere in the 350°F to 375°F range works, but 365°F gives you the most consistent results — a golden, crispy crust that’s cooked through without being greasy.
How long do you fry corn dogs?
Standard-size corn dogs take about 3 to 4 minutes at 365°F. Mini corn dogs take about 2 to 2½ minutes. You’re looking for a deep golden-brown color all around. If they brown much faster than that, lower your oil temperature slightly.
Why does my corn dog batter fall off?
The most common reasons are wet hot dogs and thin batter. Make sure you pat the hot dogs completely dry with paper towels and lightly dust them with flour before dipping. Your batter should be thick enough to cling to a spoon without dripping off quickly.
Can I make corn dogs without a deep fryer?
Absolutely. A heavy Dutch oven or deep pot on the stovetop works perfectly. You just need 3 to 4 inches of oil and a thermometer to monitor temperature. Many home cooks actually prefer this method because it gives you more control than most countertop fryers.
What’s the best oil for frying corn dogs?
Peanut oil is the top choice for flavor and performance. Vegetable oil, canola oil, and sunflower oil are all great alternatives. Use a neutral-flavored oil with a high smoke point — you want something that can handle 365°F without breaking down or adding unwanted taste.
Your Corn Dogs, Your Rules
Making corn dogs at home is one of those things that feels way more intimidating than it actually is. Once you’ve done it once — got the oil dialed in at 365°F, figured out the right batter thickness, learned how to dip without losing the coating — it becomes second nature.
The best part? You get to customize. Use your favorite hot dog brand. Add a pinch of cayenne or smoked paprika to the batter. Try cheese-stuffed franks. Make minis for the kids and full-size ones for yourself. There’s no state fair vendor telling you what goes on the stick.
So grab a thermometer, heat up some oil, and give it a shot. Your first batch might not look Instagram-perfect, and that’s totally fine. They’ll still taste better than anything you’ve pulled out of a freezer box. And by your second batch, you’ll be wondering why you didn’t start making these years ago.